Difference between revisions of "Silhouette Cameo"
(/* Plot the Design */ => - →Plot the Design onto the Material) |
(inkscape confirmed working, silhouette studio confirmed sucks, added a little more info) |
||
| Line 1: | Line 1: | ||
The Silhouette Cameo (1st generation) is a [[Availablegear#Automated_Manufacturing|CNC tool]] which takes in flat sheets of material and runs a tool left-right and up-down along it. | The Silhouette Cameo (1st generation) is a [[Availablegear#Automated_Manufacturing|CNC tool]] which takes in flat sheets of material and runs a tool left-right and up-down along it. | ||
| − | It is capable of recreating intricate designs with either a knife or a | + | It is capable of recreating intricate designs with either a knife or a writing utensil. |
| − | The Silhouette Cameo is most | + | The Silhouette Cameo is most used for cutting vinyl stickers, but has many other uses. |
| − | + | The recommended software for this machine is [https://inkscape.org/en/ Inkscape] with the [https://github.com/fablabnbg/inkscape-silhouetteinkscape-silhouette plugin]. | |
| − | + | The instructions on this page are written for this software. | |
| − | + | As of September 2023, [https://www.silhouetteamerica.com/software Silhouette's official software] is unusably buggy. | |
| − | + | ||
== Installing Software == | == Installing Software == | ||
| Line 14: | Line 13: | ||
Second, install the [https://github.com/fablabnbg/inkscape-silhouette inkscape-silhouette plugin]. | Second, install the [https://github.com/fablabnbg/inkscape-silhouette inkscape-silhouette plugin]. | ||
Instructions for Windows, MacOS, and Linux are on the GitHub page. | Instructions for Windows, MacOS, and Linux are on the GitHub page. | ||
| − | + | As of September 2023, the Windows instructions are complete and correct. | |
If you have problems, check the "issues" tab. | If you have problems, check the "issues" tab. | ||
If nobody is describing the issue you are having, feel free to open a new issue. | If nobody is describing the issue you are having, feel free to open a new issue. | ||
| Line 22: | Line 21: | ||
=== Make Your Design === | === Make Your Design === | ||
| − | + | You can draw your design in Inkscape, or import a file that you found online or drew in another program. | |
| − | + | If you plan to import a file into Inkscape, make sure it is a "vector" file (often .svg, .dxf, .pdf, .ai, or .dwg), not a "raster" or "bitmap" file (such as .jpg, .jpeg, .png, or .gif). | |
| − | + | Besides Inkscape, other popular vector drawing programs include [http://www.adobe.com/products/illustrator.html Adobe Illustrator], [https://www.libreoffice.org/discover/draw/ LibreOffice Draw], and [https://affinity.serif.com/en-us/designer/ Affinity Designer]. | |
=== Plug In === | === Plug In === | ||
| − | The cutter has a power brick and a USB cable. Plug these in to the wall and | + | The cutter has a power brick and a USB-B cable. Plug these in to the wall and the computer, respectively. |
=== Prepare Tool === | === Prepare Tool === | ||
| Line 54: | Line 53: | ||
===== Adjust Blade Depth ===== | ===== Adjust Blade Depth ===== | ||
| − | |||
| − | |||
It is important that the blade protrude the correct depth. | It is important that the blade protrude the correct depth. | ||
Too shallow, and it will not cut through the material. | Too shallow, and it will not cut through the material. | ||
(This can be used deliberately to score material for folding or tearing.) | (This can be used deliberately to score material for folding or tearing.) | ||
| − | Too deep, and it will scour the rubber pad under the print head, | + | Too deep, and it will scour the rubber pad under the print head, prematurely dull the blade, and potentially snag the material and tear it apart. |
The [http://bloominglabs.org/images/6/65/Silhouette_cameo_manual.pdf manual] describes the adjustment process for the official, plastic knife cartridge on pdf page 10 (labeled as page #9). | The [http://bloominglabs.org/images/6/65/Silhouette_cameo_manual.pdf manual] describes the adjustment process for the official, plastic knife cartridge on pdf page 10 (labeled as page #9). | ||
It also has recommended depth settings for different materials. | It also has recommended depth settings for different materials. | ||
| + | |||
| + | {| class="wikitable" style="margin:auto" | ||
| + | |+ Recommended Cutting Depths for Official Blade | ||
| + | |- | ||
| + | ! Blade Setting !! Material | ||
| + | |- | ||
| + | | 1 || Thin materials such as vinyl and smooth heat transfer material | ||
| + | |- | ||
| + | | 2-3 || Medium-weight materials such as paper, cardstock and flocked heat transfer materia | ||
| + | |- | ||
| + | | 4-6 || Thicker materials such as textured cardstock and pattern papers | ||
| + | |- | ||
| + | | 7-10 || Thick materials such as canvas | ||
| + | |} | ||
The unofficial knife cartridge is adjusted by turning the knob on the top. | The unofficial knife cartridge is adjusted by turning the knob on the top. | ||
It may be necessary to manually drag the blade across your material in order to determine whether it is adjusted properly. | It may be necessary to manually drag the blade across your material in order to determine whether it is adjusted properly. | ||
| + | |||
| + | [[File:Silhouette-adjusting-generic-blade-depth.gif]] | ||
=== Insert Tool === | === Insert Tool === | ||
Revision as of 04:36, 11 September 2023
The Silhouette Cameo (1st generation) is a CNC tool which takes in flat sheets of material and runs a tool left-right and up-down along it. It is capable of recreating intricate designs with either a knife or a writing utensil. The Silhouette Cameo is most used for cutting vinyl stickers, but has many other uses.
The recommended software for this machine is Inkscape with the plugin. The instructions on this page are written for this software. As of September 2023, Silhouette's official software is unusably buggy.
Contents |
Installing Software
First, install Inkscape.
Second, install the inkscape-silhouette plugin. Instructions for Windows, MacOS, and Linux are on the GitHub page. As of September 2023, the Windows instructions are complete and correct. If you have problems, check the "issues" tab. If nobody is describing the issue you are having, feel free to open a new issue.
Using
Make Your Design
You can draw your design in Inkscape, or import a file that you found online or drew in another program. If you plan to import a file into Inkscape, make sure it is a "vector" file (often .svg, .dxf, .pdf, .ai, or .dwg), not a "raster" or "bitmap" file (such as .jpg, .jpeg, .png, or .gif). Besides Inkscape, other popular vector drawing programs include Adobe Illustrator, LibreOffice Draw, and Affinity Designer.
Plug In
The cutter has a power brick and a USB-B cable. Plug these in to the wall and the computer, respectively.
Prepare Tool
So far, the silhouette cameo has been tested with markers and with blades.
Markers
For markers, just wrap in enough tape that it will barely fit into the "print head".
Blades
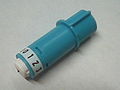
Official knife cartridge
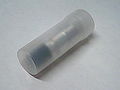
Generic knife cartridge in protective tube
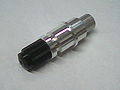
Generic knife cartridge


Blades for Silhouette's cutting machines come in cylindrical cartridges. The blade sticks out the bottom of the cartridge and pivots freely.
Bloominglabs has 2 kinds of knife cartridges for the silhouette cameo:
- the official knife cartridge, made from plastic, which must be totally replaced when dull
- an unofficial knife cartridge, made from aluminum, with replaceable blades
Adjust Blade Depth
It is important that the blade protrude the correct depth. Too shallow, and it will not cut through the material. (This can be used deliberately to score material for folding or tearing.) Too deep, and it will scour the rubber pad under the print head, prematurely dull the blade, and potentially snag the material and tear it apart.
The manual describes the adjustment process for the official, plastic knife cartridge on pdf page 10 (labeled as page #9). It also has recommended depth settings for different materials.
| Blade Setting | Material |
|---|---|
| 1 | Thin materials such as vinyl and smooth heat transfer material |
| 2-3 | Medium-weight materials such as paper, cardstock and flocked heat transfer materia |
| 4-6 | Thicker materials such as textured cardstock and pattern papers |
| 7-10 | Thick materials such as canvas |
The unofficial knife cartridge is adjusted by turning the knob on the top. It may be necessary to manually drag the blade across your material in order to determine whether it is adjusted properly.

Insert Tool

Tools drop in to the "print head" of the machine and lock in place by twisting the blue plastic knob clockwise. Be sure that the tool is seated all the way down, otherwise you way not cut all the way through, or even at all.
Load Material
Non-Adhesive-Backed Materials
For cutting materials that don't already have adhesive backing, like paper or fabric, it is recommended to use an adhesive cutting mat. (You may be able to get away without using a cutting mat, see examples here.) Cutting mats can be purchased on amazon or at major craft stores. Mats can be re-used a limited number of times, depending on whether the blade is set to be too deep or not and how well the adhesive maintains its hold.
Align your material in the top-left corner of the adhesive cutting mat.
Check that the blue knob on the right side of the cutter is pointing upward.
On the cutting machine, select the menu item "load cutting mat", and feed your cutting mat or work piece in.
Adhesive-Backed Materials
Materials that already have adhesive backing, like vinyl sheets, can be fed into the cutter directly.
If your sheet is less than twelve inches wide, the manual has instructions on adjusting the rollers for narrower sheets.
Check that the blue knob on the right side of the cutter is pointing upward.
On the cutting machine, select the menu item "load media", and feed your cutting mat or work piece in.
Plot the Design onto the Material
In Inkscape's menu bar, select Extensions -> Export -> Send to Silhouette....
A big dialog box will pop up with lots of options.
Generally, you only need to set Tool to either Cut or Pen, and set what Media you are working with.
If you find the defaults unsatisfactory, and you are sure that the blade is sharp and set to the correct depth, then you should start playing with the rest of the settings.
Finally, click Apply. The cutter will do the stuff and make the thing.
Links
User manual: File:Silhouette cameo manual.pdf
An archived copy of the product page: [1]
A PDF of the technical specifications: [2]