Difference between revisions of "Vacuum forming table"
(→Operation) |
|||
| Line 1: | Line 1: | ||
| − | Bloominglabs has a 8"x10" vacuum forming table with built-in | + | Bloominglabs has a 8"x10" vacuum forming table with built-in heating element. |
== Operation == | == Operation == | ||
| − | First you need to have a sheet of plastic prepared. It needs to be cut to 9"x11" in order for it to fit in the frame properly (the inside area of the frame is 8"x10" with a 1/2" border to grasp the sheet on all sides). Secure the sheet between the aluminum frames with the black clips. Obviously the vacuum cleaner attaches to the pipe sticking out of the bottom of the box, hook that up (duct tape recommended). Use more clips to suspend the frame assembly just underneath the heater. Remove the frame (leaving the clips in place) and turn on the heater on. It should get very hot within 2-3 minutes. Once it's reasonably hot put the frame with your plastic sheet underneath it resting on the clips. It's advisable to wear gloves at this point as the frame could get very hot. Watch the plastic start to sag as it heats up, it should happen within 30 seconds or so. Turn on the vacuum cleaner about now. Once | + | First you need to have a sheet of plastic prepared. It needs to be cut to 9"x11" in order for it to fit in the frame properly (the inside area of the frame is 8"x10" with a 1/2" border to grasp the sheet on all sides). Secure the sheet between the aluminum frames with the black clips. Obviously the vacuum cleaner attaches to the pipe sticking out of the bottom of the box, hook that up (duct tape recommended). Use more clips to suspend the frame assembly just underneath the heater. Remove the frame (leaving the clips in place) and turn on the heater on. It should get very hot within 2-3 minutes. Once it's reasonably hot put the frame with your plastic sheet underneath it resting on the clips. It's advisable to wear gloves at this point as the frame could get very hot. Watch the plastic start to sag as it heats up, it should happen within 30 seconds or so. Turn on the vacuum cleaner about now. Once the plastic droops far enough in the middle (TBD) release the frame from the clips and lower it straight down to the vacuum table with your positive mold in place. Push down on the frame to make a good seal, once the plastic is formed properly turn off the vacuum and the heater. Let it cool and pry the plastic off the positive mold. |
== Build pictures == | == Build pictures == | ||
| − | We started by building a basic vacuum table box that sucks air down from under the heated plastic sheet. An | + | We started by building a basic vacuum table box that sucks air down from under the heated plastic sheet. An old broken 19" rack-mount TV audio modulator was gutted so it could be used as an oven box. A charcoal heater was mounted inside. It has no thermostat which is ideal, but care should be taken to not leave it plugged in too long. The charcoal heater even had a flange used to prop the handle up which was perfect for mounting to the oven box. We drilled holes in it and the box and attached the two. |
{| | {| | ||
|- | |- | ||
Revision as of 05:37, 21 November 2010
Bloominglabs has a 8"x10" vacuum forming table with built-in heating element.
Operation
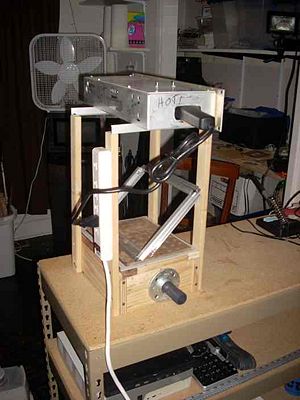
First you need to have a sheet of plastic prepared. It needs to be cut to 9"x11" in order for it to fit in the frame properly (the inside area of the frame is 8"x10" with a 1/2" border to grasp the sheet on all sides). Secure the sheet between the aluminum frames with the black clips. Obviously the vacuum cleaner attaches to the pipe sticking out of the bottom of the box, hook that up (duct tape recommended). Use more clips to suspend the frame assembly just underneath the heater. Remove the frame (leaving the clips in place) and turn on the heater on. It should get very hot within 2-3 minutes. Once it's reasonably hot put the frame with your plastic sheet underneath it resting on the clips. It's advisable to wear gloves at this point as the frame could get very hot. Watch the plastic start to sag as it heats up, it should happen within 30 seconds or so. Turn on the vacuum cleaner about now. Once the plastic droops far enough in the middle (TBD) release the frame from the clips and lower it straight down to the vacuum table with your positive mold in place. Push down on the frame to make a good seal, once the plastic is formed properly turn off the vacuum and the heater. Let it cool and pry the plastic off the positive mold.
Build pictures
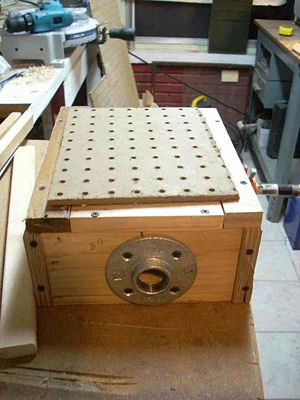
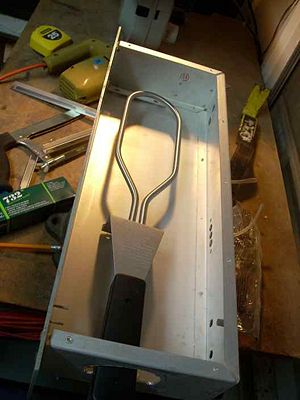
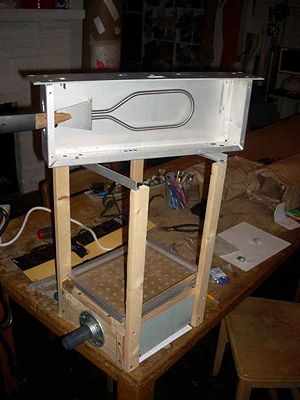
We started by building a basic vacuum table box that sucks air down from under the heated plastic sheet. An old broken 19" rack-mount TV audio modulator was gutted so it could be used as an oven box. A charcoal heater was mounted inside. It has no thermostat which is ideal, but care should be taken to not leave it plugged in too long. The charcoal heater even had a flange used to prop the handle up which was perfect for mounting to the oven box. We drilled holes in it and the box and attached the two.


